AdMob Adapter
Before You Begin
To integrate the Bidease SDK, you need an active publisher account on the Bidease Monetize platform. If you don't have one yet, please reach out to your Bidease account manager.
Prerequisites:
- Minimum Android SDK:
23(Android 6.0) - Target API:
35 - Minimal Google Mobile Ads SDK version:
23
1. Installation
Current published version: 2.2.2.
dependencies {
  implementation("com.bidease:bidease-mobile:2.2.2")
  implementation("com.bidease:admob-adapter:2.2.2")
}
Always use the latest available SDK version from Bidease.
The admob-adapter works with both the legacy Google Mobile Ads SDK (play-services-ads) and the new Next-gen SDK (ads-mobile-sdk) — no Bidease changes are required either way.
2. Initialization
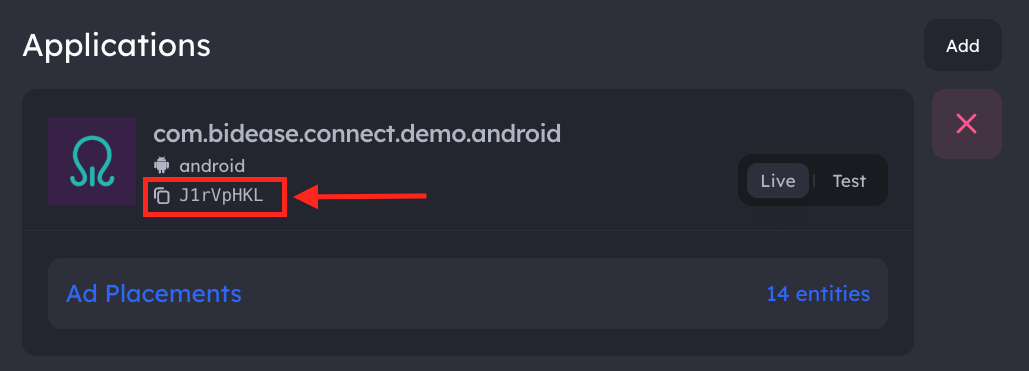
2.1. Getting your App Key
Your App Key is available in the Bidease Monetize dashboard:
- Log in to your account at monetize.bidease.com
- Go to Applications
- Open the required application
- Copy the App Key
2.2. SDK Initialization
Before initializing Google Mobile Ads, set your Bidease app key:
import com.bidease.ads.adapter.admob.BideaseMediationAdapter
import com.bidease.mobile.InitParams
import com.bidease.mobile.PrivacyParams

BideaseMediationAdapter.setInitParams(
  InitParams(
      key = "YOUR_APP_KEY",
      privacyParams = PrivacyParams(/* see Privacy & Consent */),
      customProps = mapOf("ipv4" to "203.0.113.17")
  )
)
YOUR_APP_KEY with the App Key from your Bidease Monetize dashboard.Only key is required on InitParams — privacyParams and customProps are optional. Use BideaseMediationAdapter.setInitParams(InitParams(key = "YOUR_APP_KEY")) if you don't need either. See Privacy & Consent for details.
import com.google.android.gms.ads.MobileAds

MobileAds.initialize(context)
The Bidease SDK initializes automatically when AdMob triggers the mediation adapter — no need to call BideaseMobile.init() separately.
3. Add Custom Events in AdMob Mediation
Before setting up custom events in AdMob, make sure your app and placements are registered in the Bidease Monetize dashboard. Placement names must match exactly.
Custom events are created inside a mediation group. For a full overview, see the AdMob Custom Events documentation.
3.1. Open or create a mediation group
- Go to admob.google.com and click Mediation in the left sidebar
- On the Mediation groups tab, click Create mediation group (or open an existing one)
- Set the Name, Ad unit format (Banner, Interstitial, or Rewarded), Platform (Android), and Segmentation, then add the relevant Ad units under the Ad units section
3.2. Add a custom event
- Under Ad sources → Waterfall, click Add custom event
- In the Add custom event dialog:
- Enter
Placement_Name (Mapping Name)— Placement_Name is the placement registered in the Bidease Monetize dashboard; Mapping Name is the value used in step 7 below (e.g.,interstitial_ecpm_10.0) - Set Manual eCPM to the floor price of the placement in USD
- Enter
- Click Continue
3.3. Map the custom event
- In the Map ad units dialog, click Add or edit mappings, then Add mapping and fill in:
| Field | Value |
|---|---|
| Mapping name | adformat_ecpm_X.X — where adformat is banner, interstitial, or rewarded and X.X is the floor price (e.g., interstitial_ecpm_10.0) |
| Network eCPM | Floor price of the placement (must match the value in Mapping name) |
| Class Name | com.bidease.ads.adapter.admob.BideaseMediationAdapter |
| Parameter | Same value as Mapping name |
- Save the mapping, select it for each AdMob ad unit in the group, then click Save on the mediation group
Create multiple custom events with different floor prices for the same ad format to optimize waterfall performance.
4. Privacy & Consent
Privacy signals and custom props are passed to the Bidease SDK via InitParams at initialization. Set them when you initialize the SDK, or update them at runtime via BideaseMobile.setPrivacyParams(...) / setCustomProps(...).
Not for child-directed traffic. Bidease does not purchase or monetize traffic from applications directed to children or to individuals under the age of 13. Publishers are solely responsible for identifying child-directed inventory under COPPA and other applicable laws and must not integrate the Bidease SDK into, or send any traffic or personal data from, such inventory.
import com.bidease.mobile.PrivacyParams

val privacyParams = PrivacyParams(
    coppaEnabled = false,
    subjectToGdpr = true,
    subjectToCoppa = false,
    usPrivacyString = "1YNN",
    gppString = "DBACNYA~CPXxRfAPXxRfAAfKABENB-CgAAAAAAAAAAYgAAAAAAAA~1YNN",
    gppSid = listOf(2, 6),
    userConsentString = "CPXxRfAPXxRfAAfKABENB-CgAAAAAAAAAAYgAAAAAAAA",
    subjectToLgpd = true
)
| Field | Type | Description |
|---|---|---|
coppaEnabled | Boolean? | Enable COPPA compliance |
subjectToGdpr | Boolean? | Subject to GDPR |
subjectToCoppa | Boolean? | Subject to COPPA |
usPrivacyString | String? | IAB US Privacy string (e.g. "1YNN") |
gppString | String? | IAB GPP consent string |
gppSid | List<Int>? | GPP section IDs |
userConsentString | String? | IAB TCF consent string |
subjectToLgpd | Boolean? | Subject to Brazilian LGPD |
5. Test Mode
Option 1: Enable via Code
Add the test mode dependency:
dependencies {
  implementation("com.bidease:bidease-mobile:2.2.2")
  implementation("com.bidease:admob-adapter:2.2.2")
  implementation("com.bidease:bidease-mobile-test-mode:2.2.2")
}
Option 2: Enable via Dashboard
- Go to Applications and open the required app
- Navigate to Test Devices and add the devices you want to test on — use GAID (Android Advertising ID)
- Enable Test for the application
QA Checklist
- Test Mode provides nearly 100% fill — expected behavior for QA only.
- Disable Test Mode before submitting your app to Google Play.
- Ensure GAID is available on your test device so the Bidease team can review logs.
- If you run into any issues, contact your Bidease account manager.