Native SDK
Before You Begin
To integrate the Bidease SDK, you need an active publisher account on the Bidease Monetize platform. If you don't have one yet, contact your account manager.
Prerequisites:
- Minimum deployment target: iOS
13.0 - Minimal Xcode version:
16.4
1. Installation
CocoaPods
Current published version: 2.2.2 (auto-fetched from CocoaPods trunk).
pod 'BideaseSDK', '2.2.2'
Always use the latest available SDK version from Bidease.
Update your Info.plist:
<key>NSUserTrackingUsageDescription</key>
<string>Your data will be used to deliver personalized ads to you.</string>
2. Initialization
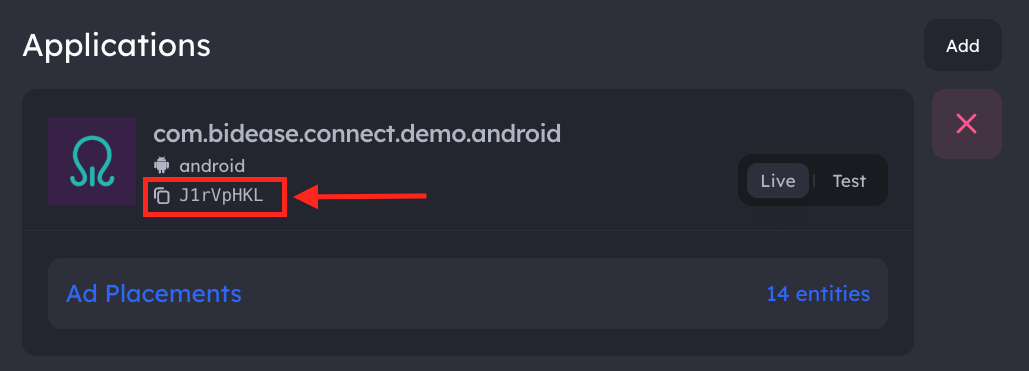
2.1. Getting your App Key
Your App Key is available in the Bidease Monetize dashboard:
- Log in to your account at monetize.bidease.com
- Go to Applications
- Open the required application
- Copy the App Key
2.2. SDK Initialization
Initialize the SDK as early as possible in your app lifecycle:
- Swift
- Objective-C
import BideaseMobileSDK

BideaseMobile.initialize(
  params: InitParams(
      key: "YOUR_APP_KEY",
      privacyParams: PrivacyConfig(/* see Privacy & Consent */),
      customProps: ["ipv4": "203.0.113.17"]
  )
) { error in
  if let error = error {
      print("Init failed: \(error)")
  } else {
      print("SDK initialized")
  }
}
#import <BideaseMobileSDK/BideaseMobileSDK-Swift.h>

BideaseInitParams *params =
  [[BideaseInitParams alloc] initWithAppKey:@"YOUR_APP_KEY"
      customProps:@{ @"ipv4": @"203.0.113.17" }];

[BideaseMobile initializeWithParams:params :^(NSError * _Nullable error) {
  if (error) {
      NSLog(@"Init failed: %@", error.localizedDescription);
  } else {
      NSLog(@"SDK initialized, version: %@", BideaseMobile.VERSION);
  }
}];
initWithAppKey: has overloads that also take privacyConfig: (a BideasePrivacyConfig) and customProps:, plus a flat initializer that accepts the privacy fields directly. See Privacy & Consent.
privacyParams and customProps are optional. See Privacy & Consent for the full list of privacy fields.
YOUR_APP_KEY with the App Key from your Bidease Monetize dashboard.3. Ad Formats
Before loading ads, create the corresponding placements in the Bidease Monetize dashboard. The placementName in your code must match the placement name configured in the UI.
The SDK supports two integration flows — Mediation, where a single load(...) call runs the auction and renders the ad, and the Bidding API, where you request a bid first, compare its price against other demand, and render only if Bidease wins.
3.1. Banner
Supported sizes:
| Constant | Size | Description |
|---|---|---|
AdSize320x50 | 320×50 | Standard banner |
AdSize300x250 | 300×250 | Medium rectangle (mrec) |
- Swift
- Objective-C
import BideaseMobileSDK

let banner = BannerView()
view.addSubview(banner)

banner.onLoaded = { print("Banner loaded") }
banner.onDisplayed = { print("Banner displayed") }
banner.onClicked = { print("Banner clicked") }
banner.onClosed = { print("Banner closed") }
banner.onFailed = { error in print("Banner failed: \(error)") }

let result = await banner.load(size: AdSize320x50, config: LoadConfig(placementName: "banner_main"))
switch result {
case .success(let data):
    print("Banner loaded: \(data)")
case .failure(let error):
    print("Banner failed: \(error)")
@unknown default:
    break
}
In Objective-C, build the size with BannerSize (the AdSizeNxN Swift constants are not exposed), set callbacks via setOn…Callback:, and load with a completion block:
#import <BideaseMobileSDK/BideaseMobileSDK-Swift.h>

@interface MyViewController ()
@property (nonatomic, strong) BannerView *banner;
@end

@implementation MyViewController

- (void)loadBanner {
    self.banner = [[BannerView alloc] init];
    [self.view addSubview:self.banner];
    // configure Auto Layout or frame

    [self.banner setOnLoadedCallback:^{ NSLog(@"Banner loaded"); }];
    [self.banner setOnDisplayedCallback:^{ NSLog(@"Banner displayed"); }];
    [self.banner setOnClickedCallback:^{ NSLog(@"Banner clicked"); }];
    [self.banner setOnClosedCallback:^{ NSLog(@"Banner closed"); }];
    [self.banner setOnFailedCallback:^(NSString *error) { NSLog(@"Banner failed: %@", error); }];

    BannerSize *size = [[BannerSize alloc] initWithWidth:320 height:50];
    BideaseLoadConfig *config =
        [[BideaseLoadConfig alloc] initWithBidFloor:nil
            placementName:@"banner_main"
            testMode:nil
            testGaid:nil
            userId:nil
            age:nil
            gender:nil];

    [self.banner loadWithSize:size config:config :^(id _Nullable response, NSError * _Nullable error) {
        if (error) {
            NSLog(@"Banner load error: %@", error.localizedDescription);
        } else {
            NSLog(@"Banner load success: %@", response);
        }
    }];
}

- (void)dealloc {
    [self.banner destroy];
}

@end
3.2. Interstitial
- Swift
- Objective-C
import BideaseMobileSDK

let interstitial = InterstitialAd()

interstitial.onLoaded = { print("Loaded") }
interstitial.onDisplayed = { print("Displayed") }
interstitial.onClicked = { print("Clicked") }
interstitial.onClosed = { print("Closed") }
interstitial.onFailed = { error in print("Failed: \(error)") }

let result = await interstitial.load(config: LoadConfig(placementName: "interstitial_main"))
switch result {
case .success(let data):
    print("Loaded: \(data)")
case .failure(let error):
    print("Failed: \(error)")
@unknown default:
    break
}

interstitial.show()
#import <BideaseMobileSDK/BideaseMobileSDK-Swift.h>

@interface MyViewController ()
@property (nonatomic, strong) InterstitialAd *interstitial;
@end

@implementation MyViewController

- (void)loadInterstitial {
    self.interstitial = [[InterstitialAd alloc] init];

    [self.interstitial setOnLoadedCallback:^{ NSLog(@"Loaded"); }];
    [self.interstitial setOnDisplayedCallback:^{ NSLog(@"Displayed"); }];
    [self.interstitial setOnClickedCallback:^{ NSLog(@"Clicked"); }];
    [self.interstitial setOnClosedCallback:^{ NSLog(@"Closed"); }];
    [self.interstitial setOnFailedCallback:^(NSString *error) { NSLog(@"Failed: %@", error); }];

    BideaseLoadConfig *config =
        [[BideaseLoadConfig alloc] initWithBidFloor:nil
            placementName:@"interstitial_main"
            testMode:nil
            testGaid:nil
            userId:nil
            age:nil
            gender:nil];

    [self.interstitial loadWithConfig:config :^(id _Nullable response, NSError * _Nullable error) {
        if (error) {
            NSLog(@"Interstitial load error: %@", error.localizedDescription);
            return;
        }
        [self.interstitial show];
    }];
}

@end
3.3. Rewarded
Rewarded ads extend interstitial with an onRewarded callback that fires when the user completes the ad.
- Swift
- Objective-C
import BideaseMobileSDK

let rewarded = RewardedAd()

rewarded.onRewarded = { print("User earned reward!") }
rewarded.onLoaded = { print("Loaded") }
rewarded.onDisplayed = { print("Displayed") }
rewarded.onClicked = { print("Clicked") }
rewarded.onClosed = { print("Closed") }
rewarded.onFailed = { error in print("Failed: \(error)") }

let result = await rewarded.load(config: LoadConfig(placementName: "rewarded_main"))
switch result {
case .success(let data):
    print("Loaded: \(data)")
case .failure(let error):
    print("Failed: \(error)")
@unknown default:
    break
}

rewarded.show()
RewardedAd adds setOnRewardedCallback: on top of the interstitial API.
#import <BideaseMobileSDK/BideaseMobileSDK-Swift.h>

@interface MyViewController ()
@property (nonatomic, strong) RewardedAd *rewarded;
@end

@implementation MyViewController

- (void)loadRewarded {
    self.rewarded = [[RewardedAd alloc] init];

    [self.rewarded setOnRewardedCallback:^{ NSLog(@"User earned reward!"); }];
    [self.rewarded setOnLoadedCallback:^{ NSLog(@"Loaded"); }];
    [self.rewarded setOnDisplayedCallback:^{ NSLog(@"Displayed"); }];
    [self.rewarded setOnClickedCallback:^{ NSLog(@"Clicked"); }];
    [self.rewarded setOnClosedCallback:^{ NSLog(@"Closed"); }];
    [self.rewarded setOnFailedCallback:^(NSString *error) { NSLog(@"Failed: %@", error); }];

    BideaseLoadConfig *config =
        [[BideaseLoadConfig alloc] initWithBidFloor:nil
            placementName:@"rewarded_main"
            testMode:nil
            testGaid:nil
            userId:nil
            age:nil
            gender:nil];

    [self.rewarded loadWithConfig:config :^(id _Nullable response, NSError * _Nullable error) {
        if (error) {
            NSLog(@"Rewarded load error: %@", error.localizedDescription);
            return;
        }
        [self.rewarded show];
    }];
}

@end
4. Privacy & Consent
Privacy signals and custom props are passed to the Bidease SDK via InitParams at initialization. Set them when you initialize the SDK, or update them at runtime via BideaseMobile.setPrivacyParams(...) / setCustomProps(...).
Not for child-directed traffic. Bidease does not purchase or monetize traffic from applications directed to children or to individuals under the age of 13. Publishers are solely responsible for identifying child-directed inventory under COPPA and other applicable laws and must not integrate the Bidease SDK into, or send any traffic or personal data from, such inventory.
import BideaseMobileSDK

let privacyParams = PrivacyConfig(
    coppaEnabled: false,
    subjectToGdpr: true,
    subjectToCoppa: false,
    usPrivacyString: "1YNN",
    gppString: "DBACNYA~CPXxRfAPXxRfAAfKABENB-CgAAAAAAAAAAYgAAAAAAAA~1YNN",
    gppSid: [2, 6],
    userConsentString: "CPXxRfAPXxRfAAfKABENB-CgAAAAAAAAAAYgAAAAAAAA",
    subjectToLgpd: true
)
| Field | Type | Description |
|---|---|---|
coppaEnabled | Bool? | Enable COPPA compliance |
subjectToGdpr | Bool? | Subject to GDPR |
subjectToCoppa | Bool? | Subject to COPPA |
usPrivacyString | String? | IAB US Privacy string (e.g. "1YNN") |
gppString | String? | IAB GPP consent string |
gppSid | [Int]? | GPP section IDs |
userConsentString | String? | IAB TCF consent string |
subjectToLgpd | Bool? | Subject to Brazilian LGPD |
4.2. Updating at runtime
- Swift
- Objective-C
import BideaseMobileSDK

BideaseMobile.setPrivacyParams(privacyParams)
BideaseMobile.setCustomProps(["ipv4": "203.0.113.17"])
#import <BideaseMobileSDK/BideaseMobileSDK-Swift.h>

BideasePrivacyConfig *privacy =
    [[BideasePrivacyConfig alloc] initWithCoppaEnabled:NO
        subjectToGdpr:@YES
        subjectToCoppa:@NO
        usPrivacyString:@"1YNN"
        gppString:nil
        gppSid:@[ @2, @6 ]
        userConsentString:@"consent-string"
        subjectToLgpd:@YES];

[BideaseMobile setPrivacyParamsWithConfig:privacy];
[BideaseMobile setCustomProps:@{ @"ipv4": @"203.0.113.17" }];
Runtime setters are no-ops before BideaseMobile.initialize(...) completes. Pass an initial value via InitParams and use the setters only for later updates.
5. SKAdNetwork IDs
The Bidease SDK supports SKAdNetwork so partner networks can attribute installs when IDFA is unavailable. Add the SKAdNetworkItems entry to your Info.plist:
- In Xcode, select Info.plist in the Project navigator.
- Right-click Info.plist → Open As → Source Code.
- Copy the SKAdNetworkItems array from the file below and paste it into your Info.plist.
6. Test Mode
Option 1: Enable via Code
Pass testMode: true in LoadConfig:
- Swift
- Objective-C
let result = await interstitial.load(config: LoadConfig(placementName: "test", testMode: true))

let result = await interstitial.load(config: .init(testMode: true))
In Objective-C, testMode (and the other optional numeric fields) are NSNumber — pass @YES / @NO:
BideaseLoadConfig *config =
    [[BideaseLoadConfig alloc] initWithBidFloor:nil
        placementName:@"interstitial_main"
        testMode:@YES
        testGaid:nil
        userId:nil
        age:nil
        gender:nil];
Option 2: Enable via Dashboard
- Go to Applications and open the required app
- Navigate to Test Devices and add the devices you want to test on — use IDFA (iOS)
- Enable Test for the application
7. QA Checklist
- Test Mode provides nearly 100% fill — expected behavior for QA only.
- Disable Test Mode before submitting your app to the App Store.
- Ensure IDFA tracking is enabled on your test device so the Bidease team can review logs.
- If you run into any issues, contact your Bidease account manager.